


How to Send Custom Order Notifications in Shopify
 Author: Joe
Intro
This guide shows you how to:
- Send custom order notifications on Shopify
- Allow people without store access to add tracking + fulfill orders remotely
I used to be a Shopify store owner, now I create automated solutions for Shopify stores. My goal with this guide is to save you time and improve the efficiency of your logistics.
Who's this guide for?
- You want to automatically notify your vendors or suppliers of new orders
- You want specific orders to be sent to your staff or partners
- You have a dropshipping store
- You want people to be able to fulfill orders and add tracking numbers without Shopify admin access
- You want to notify your manufacturer when stock gets low
Automatically Send Order Notifications by Email or CSV
We're going to use Order Automator to identify certain order conditions and send emails with specific information.
This is one of many features in the app, it's probably guaranteed to have a positive ROI by saving you time.
1. Get Order Automator here
After adding the app to your Shopify store select the Unlimited plan.
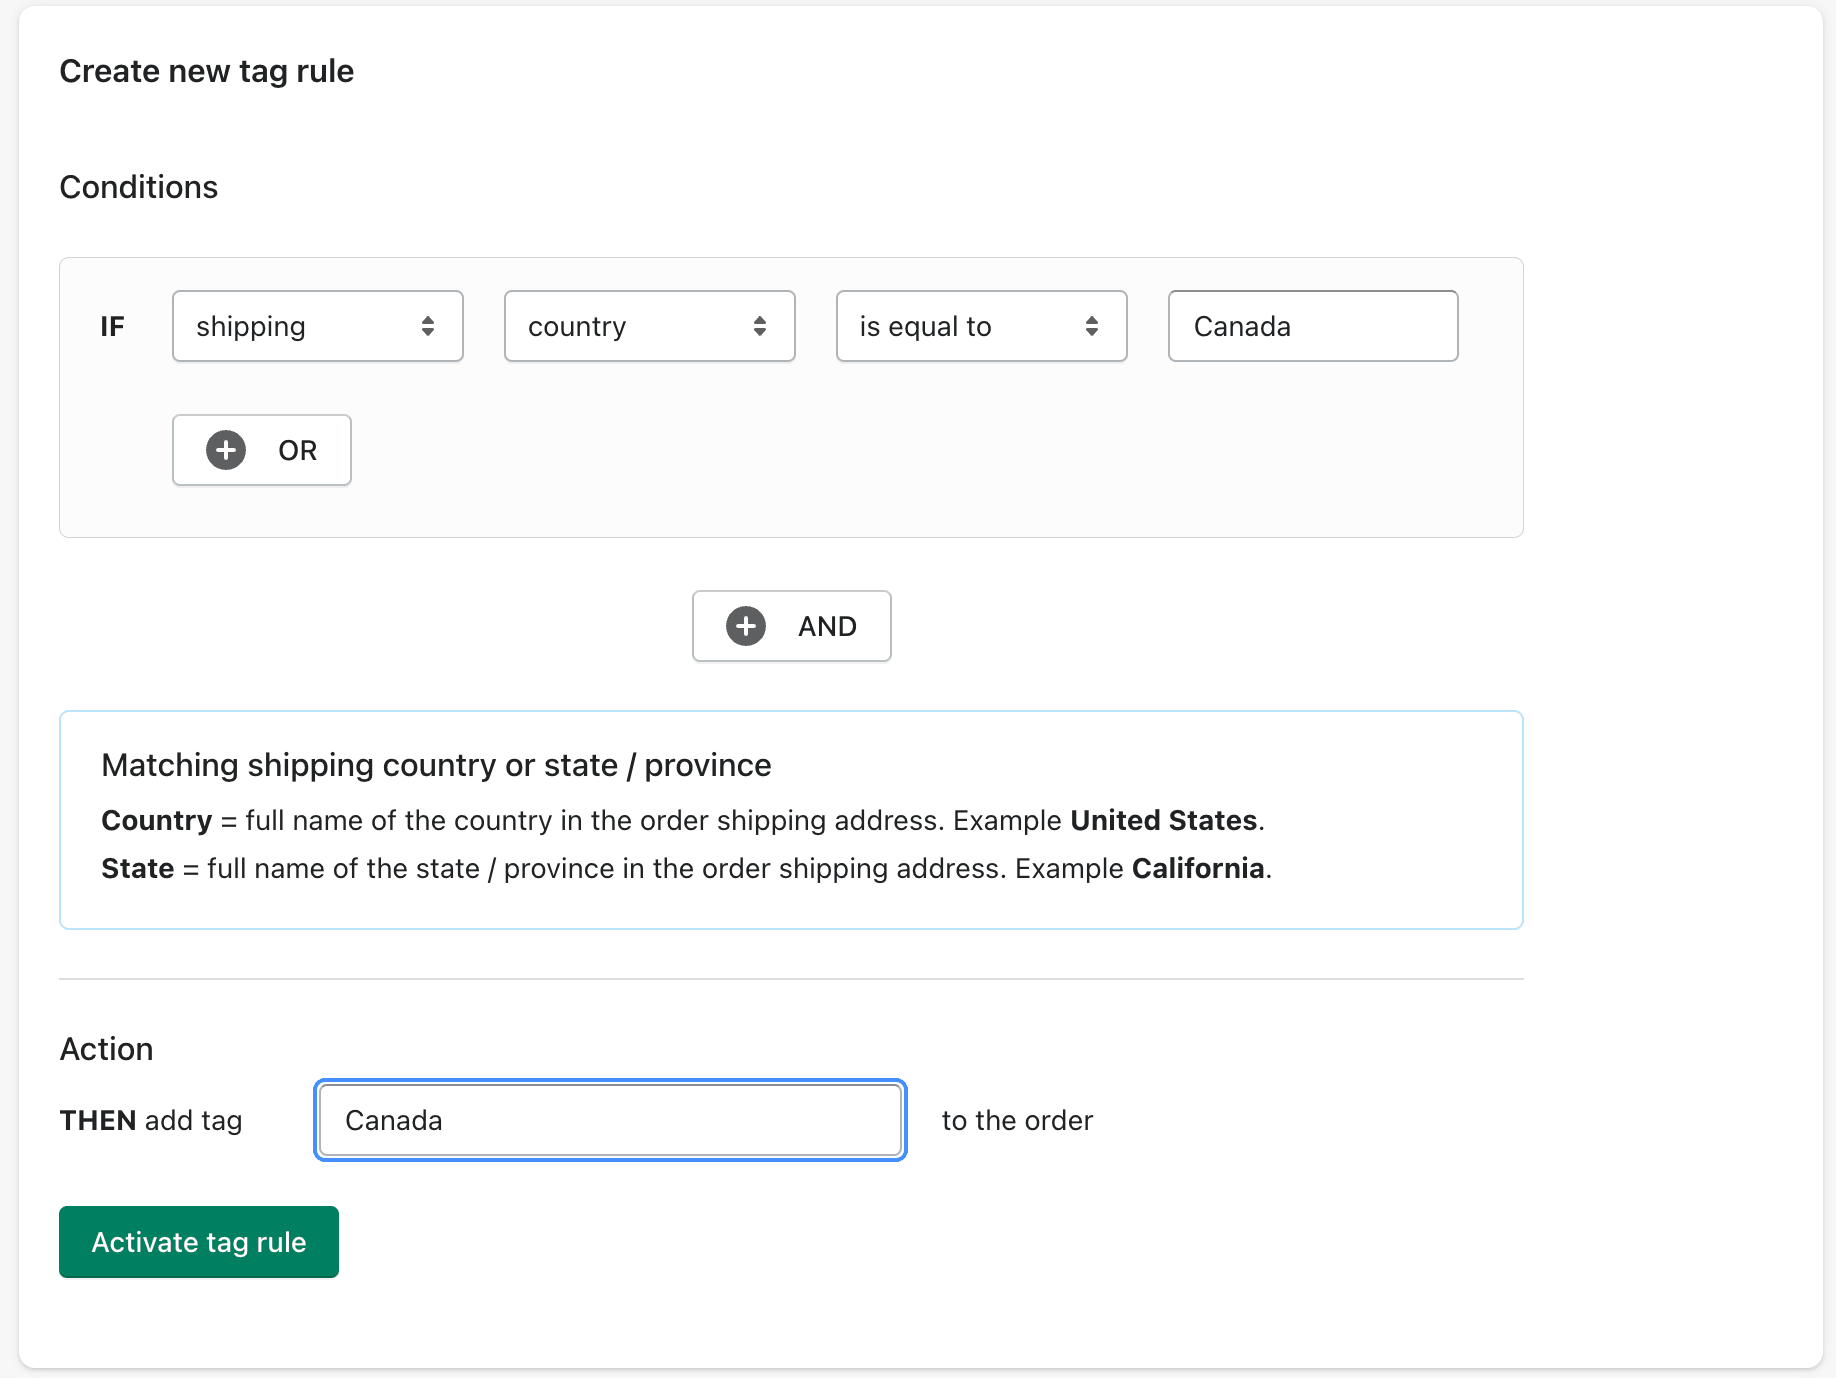
2. Create a tag rule to identify the orders you want to send
Go to the Auto Tag page in the app. Here you can create rules to identify (and tag) specific orders.
For example, this rule will tag orders that have a shipping address in Canada:
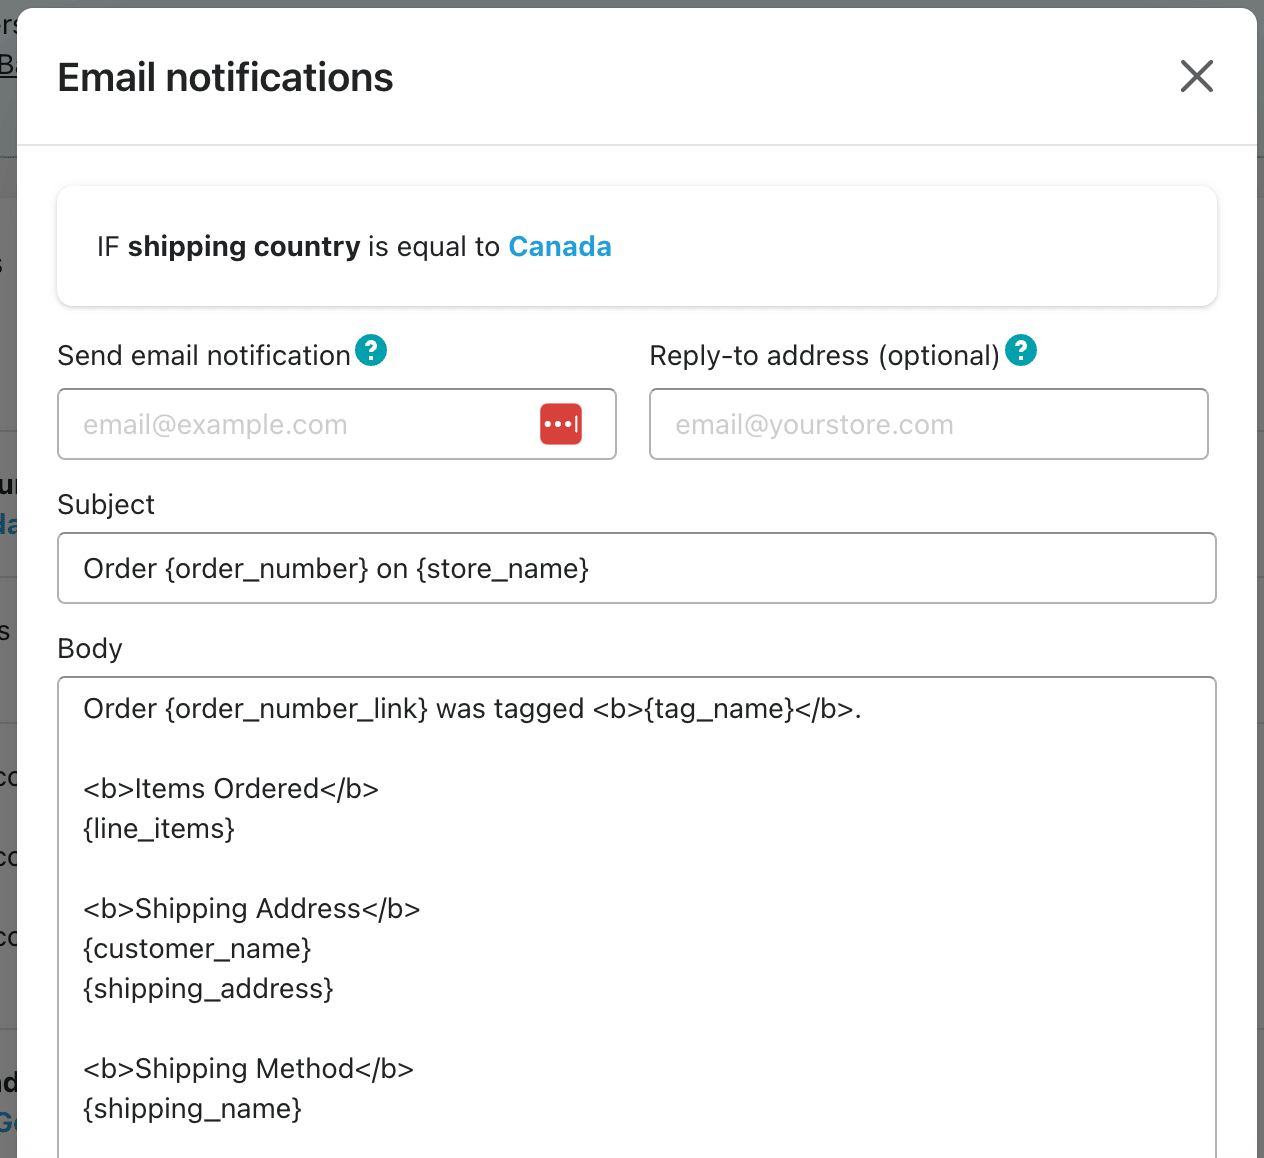
3. Add a notification to the tag rule
Click the mail icon next to the rule you just created.

You'll now see an email editor, prefilled with some placeholder content that you can edit or completely swap out.
You can use html, for example in the preview below the <b> character makes the text bold.
You can use variables, like {order_number} below. Here's a list of variables you can use: variables for custom Shopify order emails.
The editor looks like this:
4. Test your new notification rule
Go to the Batch Process page and down to the section to process 1 order.
Select the checkboxes to process tag order rules and send notifications.
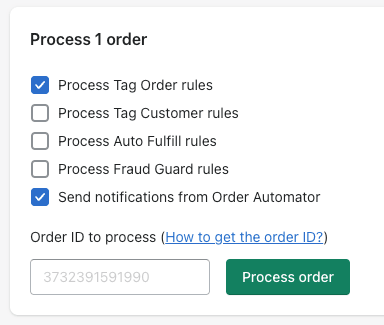
Paste in the order ID you want to test.
Process the order and wait a minute for the email to show up.
If it looks good you can update the email address if you want to send it to someone else, and now any new orders that come in and match that rule will trigger that email.
If the email didn't arrive, it means either the rule did not match the order data exactly, or it landed in your junk inbox (if you have a sensitive filter, reply to the email or whitelist orderautomator.com to prevent it being flagged).
If you want the email receipient to be able to also update the tracking / fulfill the order, see the next step.
5. Enable remote tracking
You can use these order notifications to allow the recipient to be able to update tracking without logging into your Shopify admin.
Include the {tracking_link} variable in the editor where you want it to show in the email.
Then enable Remote Tracking on the Auto Fulfill page.
Now when the email goes out, it will include a secure link to update tracking remotely using a form on orderautomator.com. Only people with this link will be able to trigger the update on that order, and the only action they can take is fulfilling / adding tracking.
If you want to test this, select an order that is not yet fulfilled, then do step 4 above, and enter the tracking after you click the tracking link in the email notification.
After tracking is submitted remotely, the order status will update in your Shopify order details page to show the item(s) fulfilled and with tracking added. This triggers the shipment notification that your store sends to the customer, with the auto generated tracking url.
6. More options
At the bottom of the email editor there's a section called Options. Different options will show depending on the rule type.
Example: Attach a CSV of the order details to the email notification.
For sending CSV's, if you want to send a daily or weekly csv, or customize the columns, contact app support to request a customization.
We also have the ability to do custom connections, for example via API to your partner's system or updating a 3rd party app like Google Sheets or Dropbox.
More Automations
Order Automator has a suite of features to expand your store's functionality. For a preview watch the app walkthrough video here.
If you want to learn some more Shopify automation tactics, including an easy inbound marketing strategy that generates free traffic where you only pay per conversion, see 7 Shopify Automation Tips to Level Up Your Store.
I hope this guide helps you save time or money... or both! May your store have great success this year. ✊
🧙♂️ If you liked this post check out our flagship app Order Automator.
The goal of Order Automator is to help you and your team save time and create new ways to improve your workflow. Most Shopify stores can benefit from at least 1 feature, even with the Free plan. 👍
About the Author:
Joe's a 10+ years Shopify partner, 7 year Shopify store owner, former Shopify optimization agency owner, creator of Order Automator, co-creator of Product Automator, and has been named a Shopify Expert. Outside of tech he's into nature adventures, travel, trees, music, books, and art. 🏕🌎🌞
Most Popular Posts


Use Cases: How to Improve Your Shopify Workflow with Order Automator
March 7, 2026 (updated)
Originally published: Nov 28, 2024


How to Connect Shopify to Amazon
June 25, 2026 (updated)
Originally published: Apr 30, 2024


Boost Customer Engagement by Adding a Thank You Page Message
February 17, 2026 (updated)
Originally published: Nov 19, 2025
Recent Posts


About Us
We make Shopify apps, custom plugins, and automated solutions.
We also have years of experience working with and managing Shopify stores.
Our mission is to save people time so they can focus on what's important in their work, business, and life.
Contact us if you own or work in a Shopify store, we'd love to help you. 👍
⚙️ Automation Apps for Shopify
Use Order Automator to save time and automate routine Shopify tasks, connect your store to 3rd party marketplaces (ex: Amazon), and extend your store's functionality.
It's customizable, and you can request specific functionality for your workflow.
Product Automator has a suite of features to help organize your products and collections, increase your conversion rate, and get operational notifications.
It's our newest app, let us know what you want us to add to it... we love building new features for our community.
👕 Best Print on Demand App
![]()
Printful is a free Shopify app that allows you to easily create print on demand products to sell in your store.
You can sell mugs, t-shirts, bags, posters, and a lot more, without storing any inventory or doing any shipping.
They ship globally and give you a quick way to add merch and accessories to your online store.
We've personally used Printful (and still use it) and think it's great. ✊
🚚 Automate Fulfillment on Shopify
![]()
Use Amazon FBA to automatically fulfill your Shopify store orders domestically and internationally.
See How to Automate Shopify Order Fulfillment with Amazon MCF / FBA to learn how to set it up.
Using the Order Automator app connected to your Amazon Seller Central account, you can do things like:
- Automatically sync inventory between Amazon and Shopify
- Automatically fulfill Shopify orders using Amazon FBA inventory
- Route Shopify orders to Amazon marketplaces around the world, handling international fulfillment
Fulfilling off-Amazon orders with your Amazon inventory is called MCF. Learn more about Amazon MCF here.
All Guides and Posts
Boost Customer Engagement by Adding a Thank You Page Message
February 17, 2026 (updated)
Originally published: Nov 19, 2025
AI Generated Review Summary - 100+ Reviews
Sep 19, 2025
What's New + What's Coming for Order Automator
Jun 10, 2025
Use Cases: How to Improve Your Shopify Workflow with Order Automator
March 7, 2026 (updated)
Originally published: Nov 28, 2024
New App Live: Product Automator
Sep 30, 2024
How to Get Visitor Location on a Shopify Site
August 29, 2024 (updated)
Originally published: Jul 31, 2024
Intro to Help Desk Apps + What We Use
October 9th, 2024 (updated)
Originally published: Jun 17, 2024
How to Connect Shopify to Amazon
June 25, 2026 (updated)
Originally published: Apr 30, 2024
How to Send Custom Order Notifications in Shopify
February 6, 2025 (updated)
Originally published: Feb 27, 2024
Should You Sell on Shopify or Amazon?
August 29, 2024 (updated)
Originally published: Oct 26, 2023
7 Shopify Automation Tips to Level Up Your Store
October 9th, 2024 (updated)
Originally published: Jun 11, 2023
How to Automate Shopify Order Fulfillment with Amazon MCF / FBA
December 26, 2025 (updated)
Originally published: May 4, 2023
Any thoughts?