How to Swap or Hide the Add to Cart Button on a Shopify site
August 29, 2024
This guide shows you how to modify the add to cart button on a Shopify site to do things like:
-
Show a different button, link, or text for certain products or situations
-
Hide the button for certain visitors or certain locations
Includes: example code snippet + how to integrate into a Shopify theme.
Contents
First step: Backup your theme
Always backup your live theme, then work off the new duplicated theme, so you can edit freely without worry of breaking the live site. After you're satisfied with the changes in the new theme, you can publish it.
Editing the code in your Shopify theme
Here's the code snippet we'll be working with (there will be copy/pastable code later):
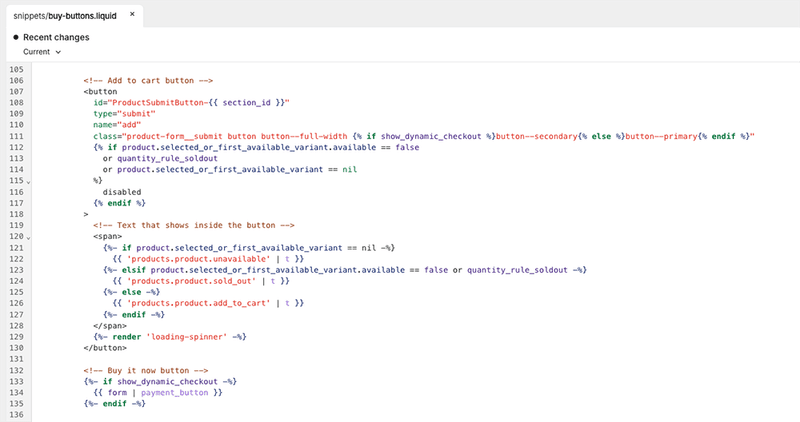
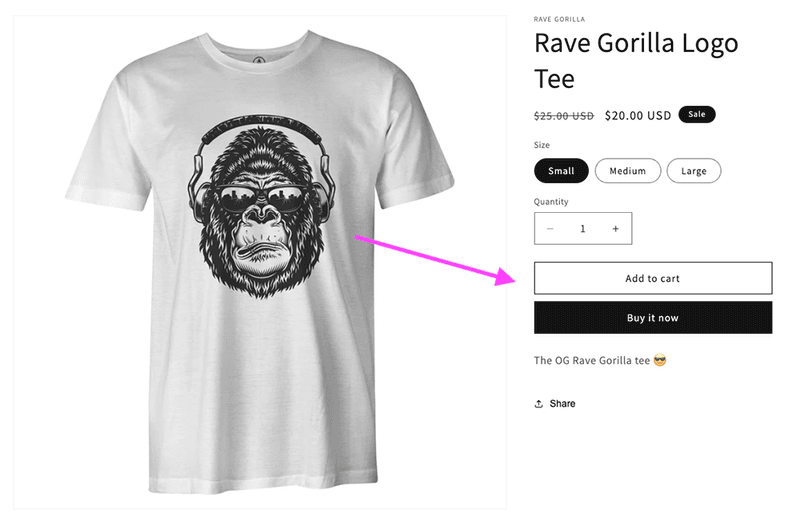
That code controls the 2 buttons here:
To open this file go to your theme editor and click the Snippets folder, then select the buy-buttons.liquid file to see this code. Yours should look similar, I just added html comments to clarify the blocks.
This example is from the Dawn theme but Shopify themes usually follow a similar structure.
If your theme doesn't have that file, search other files in the Snippets folder that look like they're for the product form or add to cart button, and search in the code for text like "add_to_cart" or "add" to find the button code.
To make things easier moving forward, I'll refer to that whole code block in the screenshot to the Add to cart button code.
Example 1: Show a different button for a certain product
Let's say you have a product in your store that you prefer the customer to buy from a different marketplace.
I've seen this example for stores that have a mix of their own products + affiliate products.
You can do something like this:
{%  if product.title == "Rave Gorilla Logo Tee" %}
  <style>
    /* Adding CSS for an optional style change to the new button */
    #new-button {
      background-color: #ffc200;
      border: 1px #ffa400 solid;
      --border-opacity: none;
      color: #000;
    }
  </style>

  <a href="https://amazon.com/link-to-the-product" id="new-button" class="button button--full-width">
    Buy on Amazon
  </a>
{% else %}
  <!-- Put your regular add to cart button code here -->
{% endif %}
Now for the product with title Rave Gorilla Logo Tee it shows a new button + custom link, like this:
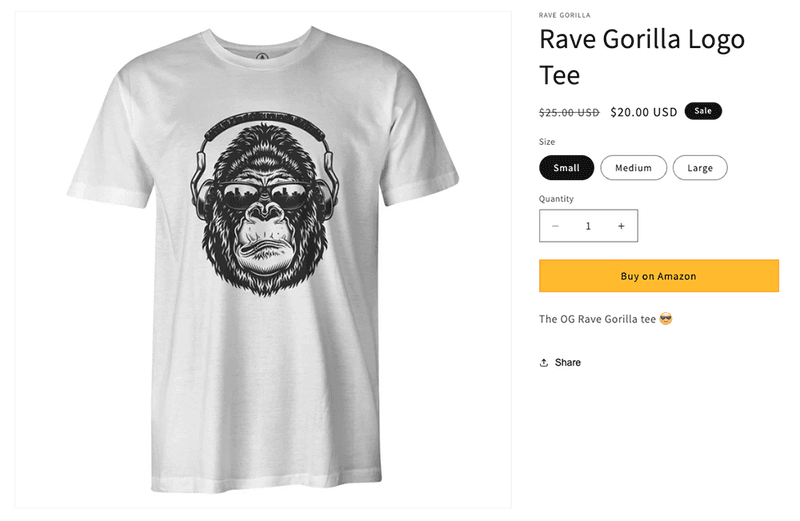
The CSS style block is just to show a quick example of changing the color. You may not want to do that. If you do want to change it, you'd probably want to add the CSS class to your custom CSS file, instead of inside the liquid code here.
Example 2: Show a new button for visitors from a certain location
Let's say your store is based in the USA but you also have inventory in European Amazon Seller Central accounts and want to allow customers to purchase "locally" from there.
For this example we're going to check if the visitor is from the UK or Germany, and if yes then route them to our Amazon store in those countrys.
This is a fairly common setup, here's a guide on connecting multiple Amazon stores for shipping Shopify orders: How to Automate Shopify Order Fulfillment with Amazon MCF / FBA
For this example, you want to first add the CSS + HTML for the button and set to display: none, so it doesn't show until the location is detected.
Add this above or below your add to cart button code:
<style>
  /* Adding a CSS class for optional style change + setting display to none so it doesn't unless called for */
  #new-button {
    background-color: #ffc200;
    border: 1px #ffa400 solid;
    --border-opacity: none;
    color: #000;
    display: none;
    margin: 10px 0;
  }
</style>

<a href="" id="new-button" class="button button--full-width"></a>
Then below your add to cart button code add this:
<script>
  fetch("https://ipinfo.io/json")
    .then(response => response.text())
    .then(data => {
      const country = JSON.parse(data).country;
      const button = document.getElementById("new-button");

      // Show the button if visitor is from UK or Germany
      if (country == "GB" || country == "DE") {
        button.style.display = "flex";
      }

      // Change the link based on country
      if (country == "GB") {
        button.href = "https://www.amazon.co.uk/your-store";
        button.innerText = "Shop our Amazon UK store";
      } else if (country == "DE") {
        button.href = "https://www.amazon.de/your-store";
        button.innerText = "Shop our Amazon store";
      }
    })
</script>
For details on how that location snippet works or more ideas to integrate that in your store see How to Get Visitor Location on a Shopify Site.
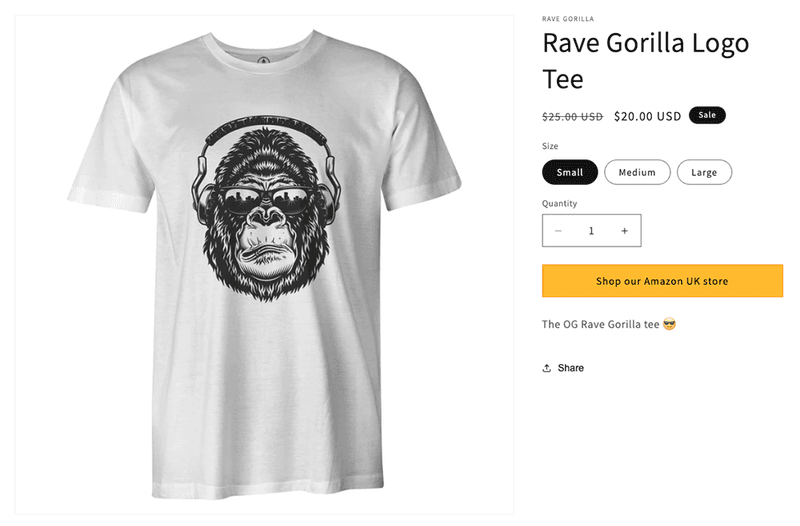
Now when a visitor is from UK (GB) or Germany (DE), that custom button will show to them, with the new link you set.
Here's what that looks like for a visitor from the UK:
Example 3: Show a new button on certain product pages for visitors from a certain location
This one is like Example 2 but adds the extra option to show a specific link based on the product the visitor is looking at.
First add the CSS + HTML for the button and set to display: none, so it doesn't show until the location is detected.
Add this above or below your add to cart button code:
<style>
  /* Adding a CSS class for optional style change + setting display to none so it doesn't unless called for */
  #new-button {
    background-color: #ffc200;
    border: 1px #ffa400 solid;
    --border-opacity: none;
    color: #000;
    display: none;
    margin: 10px 0;
  }
</style>

<a href="" id="new-button" class="button button--full-width"></a>
Then below your add to cart button code add this:
<script>
  fetch("https://ipinfo.io/json")
    .then(response => response.text())
    .then(data => {
      const country = JSON.parse(data).country;
      const button = document.getElementById("new-button");

      // Show the button if visitor is from UK or Germany
      if (country == "GB" || country == "DE") {
        button.style.display = "flex";
      }

      // Change the link based on country + product title
      if (country == "GB") {
        {% if product.title == "Rave Gorilla Logo Tee" %}
          button.href = "https://www.amazon.co.uk/the-amazon-url-for-this-product";
          button.innerText = "Buy this on our Amazon UK store";
        {% else %}
          button.href = "https://www.amazon.co.uk/your-store";
          button.innerText = "Shop our Amazon UK store";
        {% endif %}
      } else if (country == "DE") {
        {% if product.title == "Rave Gorilla Logo Tee" %}
          button.href = "https://www.amazon.de/the-amazon-url-for-this-product";
          button.innerText = "Buy this on our Amazon DE store";
        {% else %}
          button.href = "https://www.amazon.de/your-store";
          button.innerText = "Shop our Amazon DE store";
        {% endif %}
      }
    })
</script>
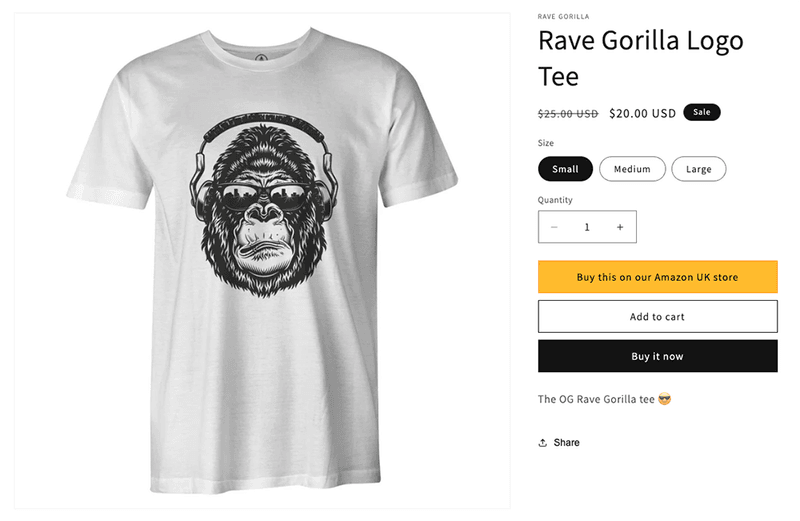
Now we see the new button text, plus the link will take them directly to the product in that other store:
Example 4: Hide add to cart button for visitors from certain countries
You might have a reason to prevent visitors from certain countries buying certain products, I've seen this asked a few times.
Below your add to cart button code add this:
<script>
  fetch("https://ipinfo.io/json")
    .then(response => response.text())
    .then(data => {
      const country = JSON.parse(data).country;
      const button = document.querySelector('[id*="ProductSubmitButton"]');

      // Hide the add to cart button if visitor is from Thailand
      if (country == "TH") {
        button.style.display = "none";
      }
    })
</script>
For this example, we hide the add to cart button if the visitor is from Thailand.
This idea popped in my head because I know people that have US based businesses and manufacture products in Thailand. In that case, you could use a combination of Example 4 to hide the add to cart button, and then add an element like in Example 3 where you could change some text, maybe just have some text say Contact us to buy locally in Thailand.
When hiding an item, you may see the item visibly show when page loads, then disappear as the code executes. One way to solve this is to set the add to cart button to display: none in the CSS, and then set the display to flex (or block, inline-block, etc) like we did in Example 3.
Example 5: Show different buttons or text based on inventory levels
Here's a couple scenarios: Show how many inventory units are left based on the country the user is browsing from. Or if you're out of stock in a certain country, offer the customer to either ship internationally or enter their email in a field to know when it's locally available.
You aren't able to get product inventory levels at different locations using just Liquid code in your theme. For this you'll either need to create a custom app to access the Shopify API, or rely on an existing app.
Our app Product Automator can do this. Send a message at productautomator.com/contact to explore that functionality.
Summary + notes
You can use these conditional showing / hiding / displaying information to give a more personalized experience for your visitors.
Try 1 of the examples above and think about where you can implement this type of feature anywhere in your theme or notifications to provide a better shopping experience for your customers.
You probably don't need a developer to integrate these, but if you have 1 on your team just share this guide with them.
If you're having trouble integrating the code examples, shoot us a message here.
Notes
- I used the example to purchase certain items from Amazon marketplaces worldwide because I've seen that done before, and also used to use this workflow myself. Works great! People get excited when the shipping arrives fast and there are no extra taxes.
Bonus tip: Sign up for the Amazon Affiliate program and use affiliate links when sending visitors to your Amazon site for a little extra revenue stream. Check Amazon Affiliate terms first to make sure you comply (you should add a disclaimer to the page, for example).
-
I just showed 5 examples but there are plenty of other ways to use this tactic. You can also use the same code snippet to conditionally show / hide elements anywhere on your site.
-
For a list of country codes see the IBAN country codes here.
Have fun!
🧙♂️ If you liked this post check out our flagship app Order Automator.
The goal of Order Automator is to help you and your team save time and create new ways to improve your workflow. Most Shopify stores can benefit from at least 1 feature, even with the Free plan. 👍
 Author: Joe


Any thoughts?